Adding a printer to a user
How a Printix printer gets onto a user's laptop, the three-letter ID, the self-service path, and the technician path through the Administrator.
Adding a printer in Printix is a two-stage idea: the printer has to exist in the tenant (registered, with a print driver in the Printix driver store), and the user’s computer has to know about the matching print queue. Both happen via the Printix Client, but who triggers it depends on the customer’s policy.
The path, one diagram
sequenceDiagram
    autonumber
    participant U as User
    participant PC as Printix Client
    participant H as Printix Home (cloud)
    participant DS as Driver store
    participant P as Printer
    U->>PC: Open menu, Printers, pick ASD Reception
    PC->>H: Query available print queues for this user/site
    H->>PC: Return queue + driver reference
    PC->>DS: Download matching print driver
    PC->>U: Install queue + driver locally
    U->>PC: Print
    PC->>P: Send job to printer (LAN)
Two things that make Printix’s add-printer story different from a plain Windows print server:
- Three-letter printer ID. When a printer registers, Printix auto-assigns a unique three-letter code (
ASD,BNM,CVB) and appends it to the printer name. So a printer the user calls “Reception” appears in the Printix Client asReception ASD. The same ID lives on the printer’s QR-code / NFC sign, so users can scan to find the right queue.
Printix exposes a Word-template printer ID sign you can print and tape to each device. It carries the printer name, three-letter ID, and a QR code:

The user reads the name first, the QR scan resolves to the same queue.
Generated from the printer’s tenant identity. Reprint when a printer is replaced or renamed; the old QR resolves to the wrong device.
- Driver delivery is automatic. The first time the Printix Client adds a queue, it pulls the matching driver from the customer’s Printix driver store. “The Printix Client…automatically uploads print drivers and puts them in your Printix driver store.” The technician didn’t ship a driver to the laptop.
The three add-printer paths
| Path | Who does it | When |
|---|---|---|
| Printix Client menu, self-service | The user | Default for SMB customers; the most common path |
| QR / NFC scan from the Printix App | The user, walking past the printer | When the customer wants frictionless onboarding |
| Administrator, Add printer | A System manager or Site manager | When discovering a new physical printer for the first time, or onboarding a print server |
The frontline technician’s lever is usually the user-side path: walk the user through their Printix Client menu. The Administrator path is for adding a printer that doesn’t exist in the tenant yet, and it lives behind the Administrator’s Printers page:
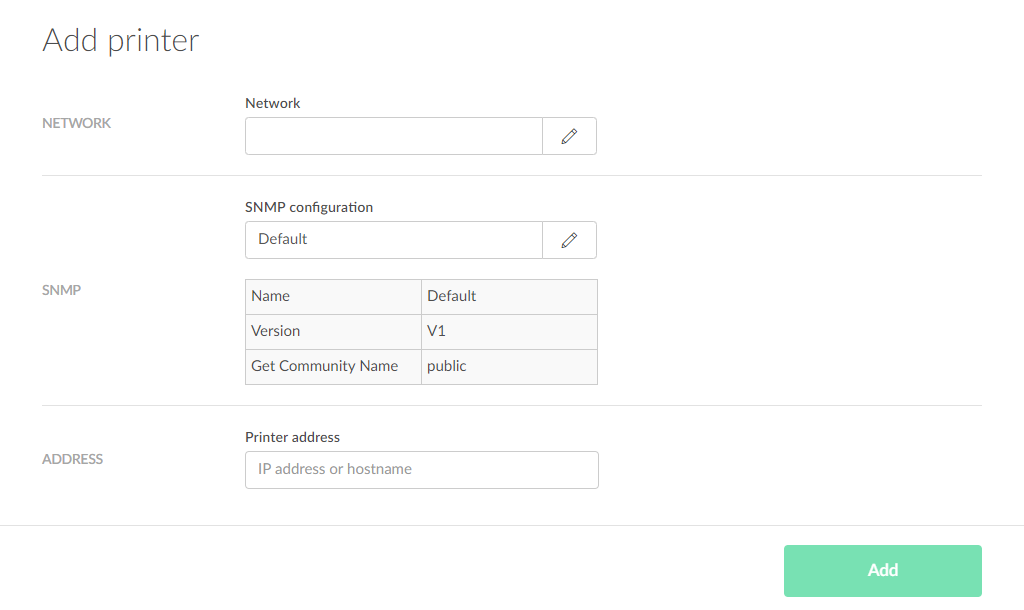
Resolvable hostname or static IP. A DHCP-only printer will work but the registration drifts when the lease changes; static is the operational default.
Pick the Network the printer lives on. This is the link that decides which users see the printer when they’re on that Network.
A worked ticket: Able Moose Accounting
Maya at Able Moose just got a new MacBook. Day one. The Printix Client signed her in automatically through Microsoft Entra. She opens a ticket: “I can’t see the warehouse printer. Reception is there but warehouse is missing.”
Sanity check: is the warehouse printer in the tenant at all?
Sign in to
ablemoose.printix.net. Menu, Printers. Search for “warehouse”. CVB Warehouse is there, status Online. Good, the printer exists.Walk Maya through the Printix Client
On her Mac she opens the Printix Client from the menu bar, selects Printers, then searches for “warehouse” or “CVB”. The result list is filtered to printers she has access to.
Add and finish
Maya selects CVB Warehouse, then Add. The Printix Client downloads the driver and installs the queue. After a few seconds the row shows Installed. She selects Finish.
Verify with a test page
Maya prints a test page from the Mac’s Printers & Scanners panel. The page comes out at the warehouse printer.
If a printer doesn’t show in Maya’s search, the cause is usually one of three things, in this order:
- Group access. The print queue has Exclusive access enabled and Maya isn’t in the right Microsoft Entra group. Check the print queue’s Groups tab in the Administrator.
- Site mismatch. The Printix Client decides which queues to offer based on the network the computer is on. A laptop home-office’d onto a residential gateway may not see office printers. Confirm Site / Network on the Computer properties page.
- Printer not active. A queue marked inactive won’t appear for users. Administrators can still see it (with a star ★ next to the printer ID), regular users can’t.